Podcast Blastoff Blog

How To Configure Your Website Layout

Nathan Fraser

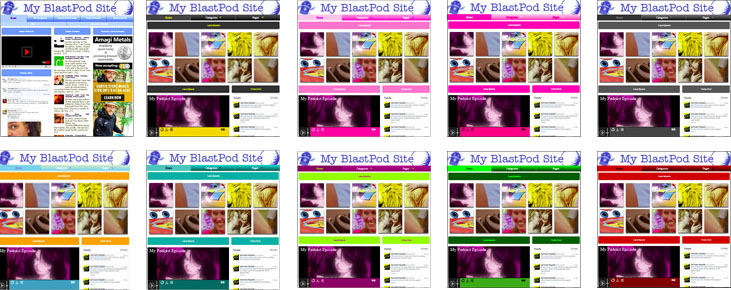
Every BlastPod account comes with two free templates, and 10 free color schemes. This allows you to customize the look and feel of your podcast website. By default, your website will be set to the Clear Blue color scheme, and the Classic template. Customizing your podcast website is quick and easy, and only takes a couple of seconds.

Let’s go back to the Site Configuration page, and click on the Site Template field, just right of the site preview image. If you have purchased other templates, they will appear in the drop-down menu. If not, you will be able to choose between “Classic”, and “New Style”.

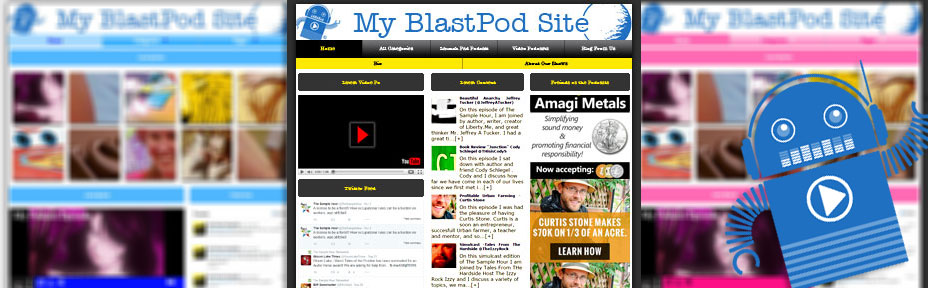
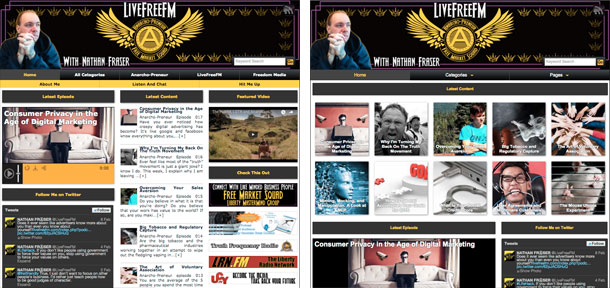
Classic is built to resemble a classic blog layout, with the most recent posts listed down the middle column. This option gives your site a more traditional media website feel, and is best for informational style podcasts.

New Style is built to look a little more edgy. The post preview images appear larger and at the top of the front page, rather than listed down the center. This layout is better suited for entertainment themed podcasts.

After you have posted a couple of episodes, you may want to play around with this option and see what you prefer for your website. Additional templates will also be available for purchase in the BlastPod Store.

Next, you’ll want to pick your color scheme. You get access to 10 free color schemes, with more available in the BlastPod Store. Color schemes allow you to change the button colors, page title colors, and widget title colors. If you have a logo or brand color, pick the color scheme that best matches it. If not, choose a color scheme that feels like the best match for your podcast. Your podcast player, search bar, and mobile hamburger menu will also change colors, based upon what color scheme you pick.

Now that you’ve chosen your layout and color scheme, you’re almost done. It’s time to add some custom header art, and really make it a site of your own.

Podcast Blastoff Blog

How to Activate Disqus Commenting

Nathan Fraser

Comments Are Huge.

We know you need to have a comments section for your podcast. Comments let you connect with your audience. They make your podcast a conversation, as opposed to a lecture. They allow feedback. And they let your listener know that you care about what they have to say. This makes them more likely to care about what you have to say.

That's why we chose to integrate Disqus comments system into your BlastPod experience. Disqus is the most popular comment application out there, and using it with BlastPod is super easy. Don't worry. You don't have to allow comments on your podcast post. But if you choose to, we've lined up with the best comment system out there, and made it easy for you.

If you want to enable Disqus comments for your BlastPod website, follow the simple steps, below.

  1. Log in to your BlastPod account, and choose Disqus Comments Widget Setup from the Widgets And Extras button in the toolbar.
  2. Click on the Disqus Account link, to retrieve your Disqus "shortname". If you do not yet have a Disqus account, set one up. They are free, easy to use, and allow you to comment on all of the top blogs and podcasts.
  3. Log in or create your account, and select the Admin option from the Settings tab.
  4. Click on Installing Disqus.
  5. Now, you need to find your "shortname". The easiest way to find it is in the Tumbler setup. So, hover over the Tumbler icon, and click on it.
  6. Almost done. On this page, you'll find your "shortname" for your Disqus account. It should be in the second line. See the pic below if you have trouble finding it.
  7. Copy and paste your shortname from your Disqus account into the "shortname" field, back one the Disqus Comments Widget Setup page of your BlastPod account. To activate comments, insure that the switch is in the "on" position, and click "save changes" at the bottom of the screen.
  8. Done!!! Your listeners can now leave comments on your podcast posts, and you can now take your listener engagement to the next level.

We know that this will help you in your podcasting journey and we're excited to see how it will help your audience grow.

Podcast Blastoff Blog

How To Create Your Website Title

Nathan Fraser

The first thing you’re going to want to do is fill in the SITE TITLE information. This is what will be displayed in the browser tap when someone is view your website.

This is also the first thing Google looks at for relevance when somebody does a search for the topic of your podcast, so it’s pretty important that you fill this out.

We’re going to give you some best practice tips for using this feature, and then show you how to access it for your BlastPod website.

The biggest mistake people make is to only put their podcast name in this tab. It looks pretty, but it does not help you get found on searches. I add my podcast name, but I put it last, as google determines relevance based on order of appearance. For this reason, I plug in my related keywords, first, and my podcast name, last.

Keywords are the words that you want to show up for in the search engine. What is your podcast about? Who would be your ideal listener? What are they likely to be searching for on the internet that you would want your podcast to show up in the search results?

You want to keep it short, under 55 characters, and related to the focus of your show. I use a pipe to separate keywords, have two sets of keywords, followed by my site name. The pipe is the shifted key, located directly above the Enter key. It looks like this, “|”. An example of a good SITE TITLE is “Liberty Entrepreneur | Podcast | LiveFreeFM”.

My podcast is about liberty and entrepreneurship, so I want it to show up when people search for those keywords. I also want people looking for podcasts to see me, so I put “Podcast” in the second keyword batch. Lastly, I put the name of my site, incase people are looking specifically for my show.

If your podcast is about classic cars, and it’s called HotRodCast, a good site would be “Hot Rods | Classic Cars | HotRodCast”. To set the SITE TITLE for your BlastPod website, go to Site Configuration, and fill in the information in the top left input box. Remember to use the pipe “|” key to separate keywords. Once you have entered the information you want to be displayed, simply scroll down the page and click on the “Save Changes” button.

Now, your site is ready to be found by the search engines. It may take a lot of work to reach the front page, but getting your SITE TITLE is the first step to that goal.